CenterPoint Accounting for Agriculture
- Crop Contracts
| Document #: | 3109 | Product: | CenterPoint® Accounting for Agriculture |
|---|
Crop contracts are tracked in CenterPoint using inventory locations. Balances can be maintained by inventory location making it easy to see the value of your inventory that is under contract using the Inventory Balances report.
Step A - Create Inventory Locations (One-Time Setup)
Step B - Maintain Inventory balances by location (One-Time Setup)
Step A - Create Inventory Locations (One-Time Setup)
To track contracted inventory, you will need to setup an inventory location for each grain contract. These locations are in addition to your non-contracted inventory locations. For example, Burton Elevator - Contracted.
- On the Setup menu, point to General, and then click Inventory Locations.
- Click New to create a new blank location. Or if the location be adding is similar to an existing location, you can highlight the similar name and click Copy. This will create a new location using all of the information in the highlighted location.
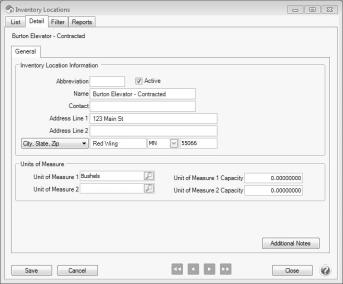
- In the Abbreviation box, enter up to ten characters of optional information that you can easily identify the inventory location by. Abbreviation is optional.
- In the Name box, enter up to 30 characters of required information that describes the inventory location.
- The remaining fields on the location setup screen are optional.
- Enter the Address. The address is optional.
- In the Unit of Measure 1 and 2 boxes, select a unit of measure stored at this inventory location. Unit of Measure are optional.
- In the Unit of Measure 1 and 2 Capacity boxes, enter the maximum amount of the unit measure that can be stored in this inventory location. Unit of Measure Capacities are optional and are for information purposes only.
- Click Save to save the inventory location and return to the List tab, or click Close to save the inventory location and close the Inventory Locations screen.
- Repeat steps 2-9 for each contract.
Step B - Maintain Inventory Balances by Location (One-Time Setup)
In order to see the balance in each inventory location, the account category needs to be setup to maintain balances by inventory location. This will allow you to use the Inventory Balances report to see the balance of your contracted and non-contracted inventory.
- From the Setup menu, select Accounts and click on Account Categories.
- Find the Raised Crops Inventory category on the list. Select it and click Edit.
- Click on the Balance Detail tab.
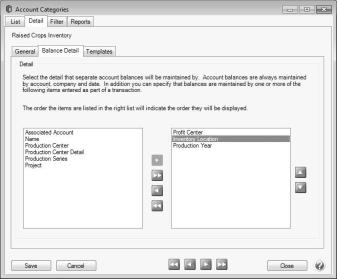
- Select Inventory Location from the list on the left and use the green arrow button to move it to the right. CenterPoint will keep separate account balances by each detail that is in the list on the right. Balances will be displayed in the order the details are listed in. Inventory Location is required to keep separate balances for contracted and non-contracted inventory. The other details are optional. Common selections are Profit Center, Inventory Location , and Production Year.
- Click Save.
Step C - New Crop Production
When entering New Crop Production, be sure to specify the correct Inventory Location. See the New Crop Production Transaction topic for step-by-step instructions.

Step D - Move Inventory to the Contracted Location
When grain goes under contract, use an inventory adjustment to move the contracted amount from the regular inventory to the contracted inventory location.
- Select Processes > Production > Crop Inventory Adjustments
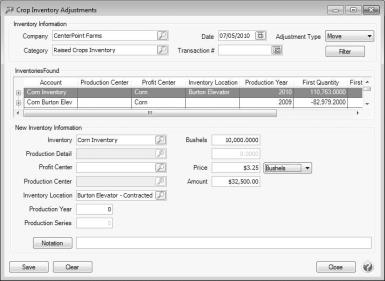
- Fill out the Inventory Information section at the top of the screen:
- Select the Company
- Enter the transaction Date.
- Choose Move for the Adjustment Type
- Select Raised Crops Inventory in the Category field.
- Enter a Transaction # if desired.
- Highlight the Inventory you wish to move.
- Complete the New Inventory Information section at the bottom of the screen:
- Select the Inventory account.
- Pick the contracted Inventory Location.
- Enter the number of units (Bushels, for example) that have been contracted.
- Enter the contracted Price.
- Click Save.
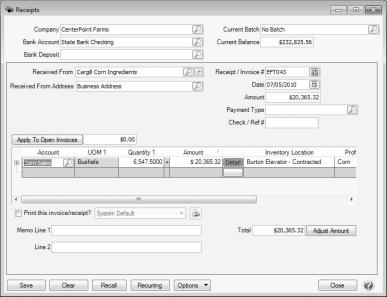
Step E - Sell Inventory
When selling from inventory, specify a contracted on non-contracted sale by selecting the correct inventory location on the receipt screen. For step-by-step instructions, refer to the Selling Raised Inventory topic.